
How to apply tile adhesive to the substrate
When tiling a wall or floor, good preparation is essential. One of the most important steps in this process is applying tile adhesive. Whether you are a seasoned professional or getting started yourself for the first time in the bathroom or kitchen: correctly applying tile adhesive is crucial for a clean and durable end result. In this article, we explain step by step how to apply tile adhesive to the substrate, both for walls and floors. You will learn how thick to apply tile adhesive, which tools you need and what to pay attention to for a perfectly even tile surface.
Preparing the substrate for tile adhesive
A clean, dry and level substrate is the basis for properly applying tile adhesive. This applies to both floors and walls.
- Remove dust, grease and loose particles.
- Fill holes or cracks with a leveling compound.
- Treat absorbent substrates with a primer.
- Make sure the substrate is not too smooth.
With uneven floors, we recommend leveling beforehand. After that, you can use a leveling system to lay the tilework perfectly straight. Also view our category Levelling products.

Applying tile adhesive on the floor
Applying tile adhesive on a floor is a precise task that determines how firm and level your tile floor will ultimately be. With the right preparation and method, you ensure a long-lasting and professional result. Below you can read step by step how to approach this.
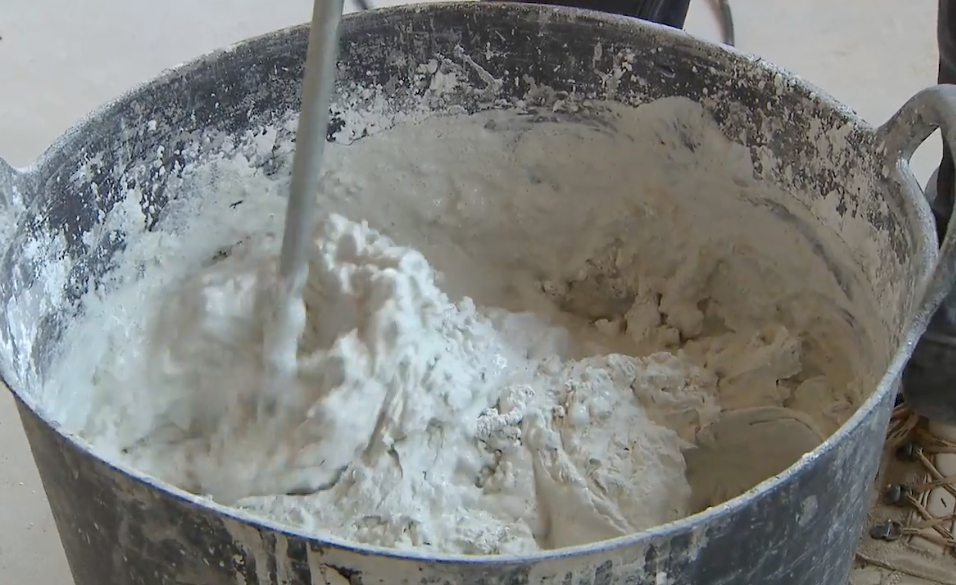
1. Prepare the tile adhesive
Start by mixing the tile adhesive. Preferably use a cement-based powder adhesive when working on a larger floor or with ceramic tiles.
Mixing ratio: Carefully follow the manufacturer’s instructions. Add water to the adhesive (not the other way around) and use a drill with a mixing paddle to obtain a smooth, lump-free mass.
Let the adhesive rest: After mixing, let the adhesive rest for 5 minutes (maturing), and then briefly mix it again. This ensures optimal workability.
2. Choose the right trowel
The notching of the trowel is crucial for a good distribution of the adhesive.
- For small floor tiles (up to 30x30 cm): use a trowel with 6 to 8 mm notching.
- For medium to large floor tiles (from 60x60 cm): use 10 to 12 mm notching, or a half-moon trowel.
- Tile with relief or grooves? Then use a coarser trowel so that the adhesive penetrates the structure well.
Correct notching helps to apply the right thickness of tile adhesive, which usually comes down to 3 to 5 mm.

3. Apply the adhesive correctly
Now that you have prepared the adhesive and chosen the right trowel, you can start applying the tile adhesive on the floor. Follow this method for an even distribution and optimal adhesion:
- Start in a corner of the room, preferably the one furthest from the door. This way you work outward and prevent walking over the fresh adhesive.
- Work in zones of a maximum of 1 to 1.5 m². Never apply adhesive on a larger surface than you can tile within 15 to 20 minutes. Adhesive that lies too long loses its bonding strength.
- Apply the adhesive with the flat side of the trowel. Spread an even layer over the substrate. Make sure the adhesive adheres well to the floor, without air bubbles.
- Then draw straight adhesive ridges through the layer with the notched side of the trowel. Always do this in the same direction (for example from left to right), so that air can escape properly when you press the tile down.
- Use the correct notching of your trowel, depending on the size of the tile (see step 2). The ridges ensure that the adhesive spreads well under the tile when placing it.
- Work cleanly, remove excess adhesive immediately with a damp sponge or cloth. Hardened adhesive residues are difficult to remove and can disturb the grouting.
For large or heavy tiles (for example 60x60 cm or larger), use the “buttering-floating” technique. In this case, you not only apply adhesive on the floor, but also a thin layer on the back of the tile. This prevents hollow spaces under the tile and significantly improves adhesion.

4. Hoe dik moet je tegellijm aanbrengen?
The correct thickness of tile adhesive is essential for a firm adhesion and a level floor. The required layer thickness depends on three important factors:
Tile size
Larger tiles require more adhesive to make full contact with the substrate.
Flatness of the substrate
With a perfectly leveled floor you can work thinner. With slight unevenness, a thicker layer is needed to compensate.
Type of trowel you use
The larger the notching of the trowel, the thicker the adhesive layer you apply.
Practical guidelines:
Standard floor tiles (up to approx. 45x45 cm)
Use a trowel of 8 to 10 mm → average adhesive layer: 3 to 5 mm.
Large floor tiles (60x60 cm or larger)
Use a trowel of 12 mm or larger → adhesive layer: 6 to 8 mm.
Very level floors
Here you can possibly work slightly thinner, provided you maintain full coverage.
Important: regularly check during installation whether you have at least 90% contact surface between the tile and the adhesive. You can do this by occasionally lifting a tile. Do you see dry spots or cavities? Then you need to apply the adhesive thicker or adjust the trowel.

Applying tile adhesive on the wall
Applying tile adhesive on a wall is largely similar to bonding floor tiles, but requires slightly more precision. Because you are working against gravity, it is important to work carefully and in the correct order.
This is how you proceed:
- Always work from bottom to top
Start with the bottom row, placed on a straight wooden batten or aluminium strip that you fix level on the wall. This prevents tiles from sliding and gives you a stable base for the entire tiled surface. - First set a vertical and horizontal guideline
Draw a plumb line in the center of the wall in advance and a horizontal line at working height. This way you work perfectly straight, especially with large surfaces or when working with patterned or decorative tiles. - Use a sliding and pushing movement when placing
Wall tiles adhere better if you not only press them, but also move them slightly back and forth in the adhesive (for example 1–2 cm up and down). This increases the contact surface and prevents air behind the tile. - Limit the number of rows per session
Especially with larger tiles or heavy materials, it is best to work in sections of 3 to 4 rows at a time. This prevents the weight of the upper tiles from pushing or sliding the lower ones down. - Use temporary wedges or spacers
Place wedges or spacers between the tile rows to prevent sinking. These supporting tools ensure that each row stays tightly in place during the drying of the adhesive.

Whether you level the floor with a leveling system, work with large wall tiles or install a tile wall for the first time: the right technique and materials make the difference.
At Nivello you will find everything you need for a perfect result:
- Levelling products
- Tile spacers
- Tiling tools

